Beginner’s Guide to Advanced Custom Fields in WordPress
WordPress custom fields can be used on a post, page, or any custom post type to offer any extra information known as metadata.

WordPress is well-known for being user-friendly and adaptable, making it suitable for both novice and experienced users. If you fall into the latter group, you may wish to investigate and utilize all of WordPress’s built-in capabilities.
Custom fields are one feature that will give you greater control over your content. You may augment your posts and pages with structured data by using custom fields. You may use the Advanced Custom Fields plugin to add custom fields to your WordPress site if you want an even easier interface with more possibilities.
Advanced Custom Fields in WordPress
WordPress custom fields can be added to a post, page, or any custom post type to offer any extra information known as metadata. Metadata is managed using pairs of keys and values, where the key is the name of the metadata element and the value is the information that will show in the post’s metadata list. If you want to add this sort of structured data to your posts and pages, follow the steps below to create custom fields in your WordPress admin.
Advanced Custom Fields in WordPress: How to use them
- Go to your WordPress dashboard and sign in
- Go to a certain post or page, or create a new one
- At the top of the right sidebar, click the three dots icon.
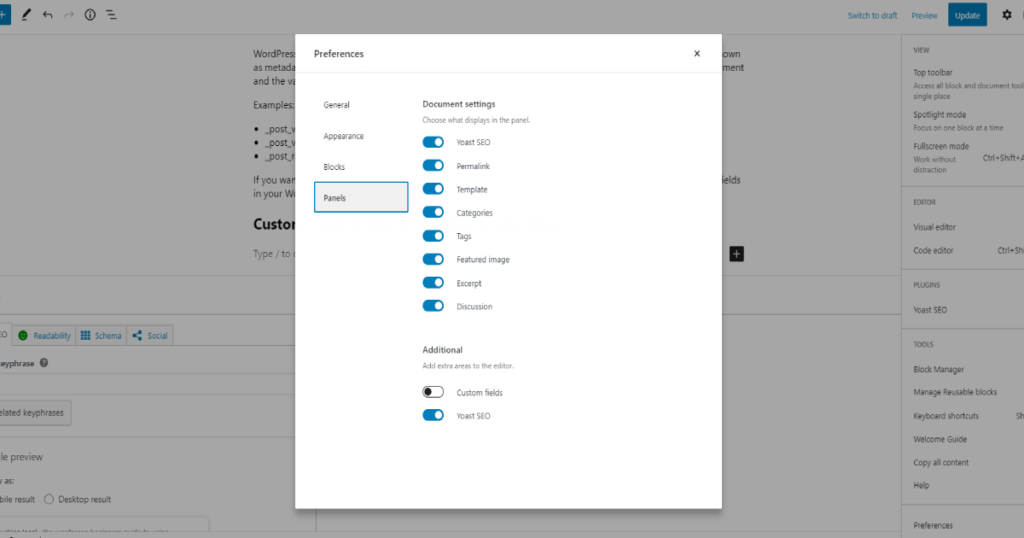
- Scroll to the bottom and select Preferences
- A new window will be opened, panels should be selected
- Toggle the Custom Fields button. This will cause the page to refresh
- Scroll down to the Custom Fields section at the bottom of the post
- To preserve this metadata for that post, click the Add Custom Field button.
- When you’re finished, click Update
- If you create or update another post or page, the Custom Fields section will already be visible

While not difficult, this procedure is not the most user-friendly or flexible. For these reasons, many users prefer the Advanced Custom Fields plugin to WordPress’s core custom fields feature.
Custom Fields in WordPress: Advanced Custom Fields
Advanced Custom Fields, or ACF for short, is a WordPress plugin that gives WordPress developers more control over their custom fields. The free version is great if you are a beginner and will allow you to quickly and simply add 30+ fields to your WordPress dashboard, and display the custom field values in any template file of the theme.
ACF’s premium version is Advanced Custom Fields Pro. It has more features, functionality, and versatility than the free version. For example, the repeater field, and the ACF blocks field.
Advanced Custom Fields: How to use them?
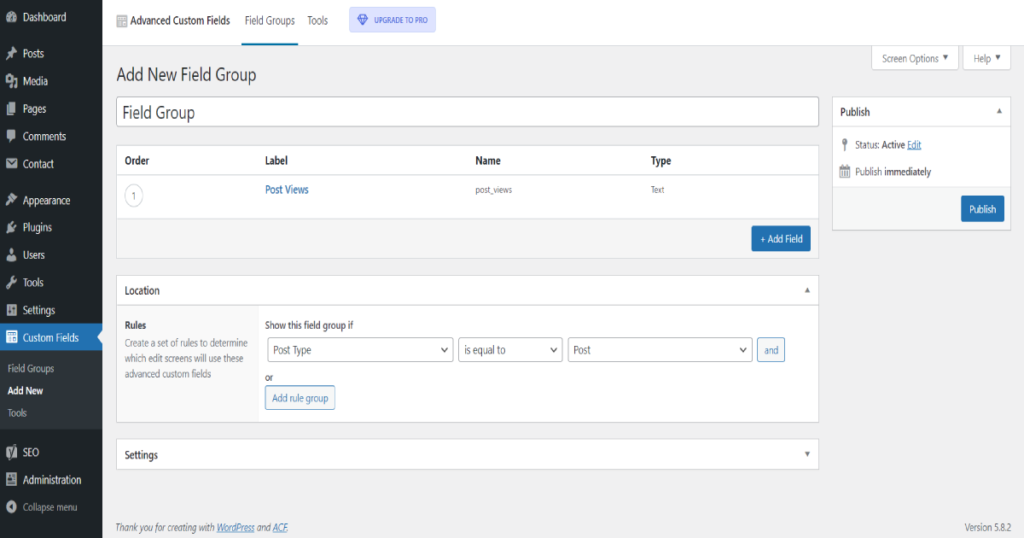
- First, you need to create a field group.
- Include the custom fields in that field group
- Select a Location where you’d like the custom fields to appear
- In the WordPress post editor, modify the custom fields
- Display the custom fields on your website’s front-end

You may modify the field values now that the field group has been published and is configured to show on post-edit screens by going to Posts (Add new). Fill in a value for each custom field on this screen.
This data will now be saved in your database. However, it will not be visible on the front end of your website. If you preview a single post, you can see how the post will look.
Display the custom fields on your website’s front end.
You may use a shortcode or update your theme’s template files to show Advanced Custom Fields data on the front end of your site. Although editing a template file necessitates some technical expertise, it is the most effective and scalable method of displaying ACF data. Using a shortcode is a quicker option, but it is also a lot more laborious. To show ACF data on the front end, you’ll need to add a shortcode to each post.
Depending on where you put your field group and your theme, you’ll either update the single.php or single-$post type.php file or utilize template elements or filters to customize the HTML of your WordPress posts or custom post types so that custom fields appear on the front end.
<?php

get_header(); ?>

    <div class="single-post">

        <?php
        // Start the Loop.
        while ( have_posts() ) :
            the_post();

	        ?>

            <div class="content-single">

                <div class="content-container">
                    <div class="content-wrapper">
                         <div class="content">
                            <?php the_content(); ?>
                        </div>

                        <div class="acf-fields">
                            <?php
                                // location is the key of your custom field
                                $location = get_field('location');

                                if( $location ):
                                    the_field('location') ;
                                    // or
                                    // echo $location;
                                endif;
                            ?>
                        </div>
                    </div>
                </div>

            </div>

        <?php

        endwhile; // End the loop.

        ?>

    </div>

<?php

get_footer();
It is suggested, however, that you build a child theme since any changes you make directly in your theme editor will be deleted the next time you update your website. Once built, repeat the process of adding the preceding code snippet to the single.php file in your child theme’s directory.
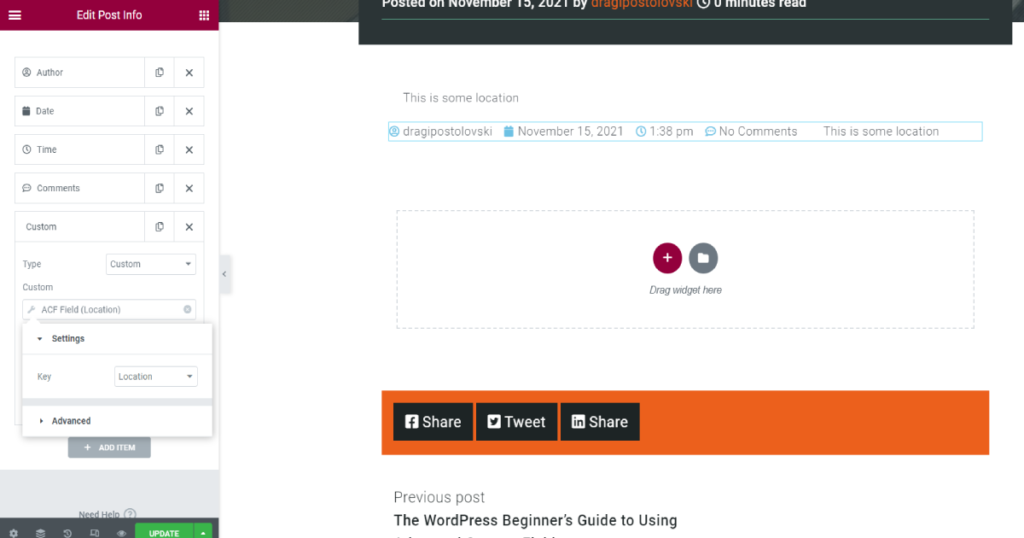
Display the custom fields using Elementor
In order to do that you’ll need the pro version of Elementor. Just edit your post with Elementor and add the Post Info widget using a single drag and drop from the Elementor widget dashboard.

Taking Content Editing to Greater Heights
The ACF plugin gives you additional control over your WordPress site’s backend and front end. It allows you to create custom fields almost anywhere in your WordPress dashboard and show them almost anywhere on the front end. These custom field data may be used to enhance your articles, taxonomies, media files, and other content.
Was this post helpful? ( Answers: 0 )
Leave a comment
If you enjoyed this post or have any questions, please leave a comment below. Your feedback is valuable!