WordPress: Advanced Custom Fields and Gutenberg Custom Blocks
WordPress posts and pages have a restricted variety of data input fields by default. External tools are required to collect and display custom data.

WordPress posts and pages have a restricted variety of data input fields by default. External tools are required to collect and display custom data. This is where Advanced Custom Fields may help. You may use this plugin to build new custom fields that allow you to gather and show more information than the normal fieldset allows. In this post, we’ll show you how to utilize Advanced Custom Fields to build custom field groups and fields, add them to your theme using HTML, CSS, and PHP, and even create a Gutenberg block without using JavaScript. You’ll also learn how to create rules to control field display and export field groups for use on another WordPress site.
Table of Contents
- Getting Started with ACF
- What exactly are custom fields?
- ACF free vs. ACF PRO
- Downloading and installing ACF
- Creating Field Groups with ACF
- Displaying Your Fields
- Displaying basic fields
- Creating a Gutenberg Block
- Defining your block in code
- Defining your block in the admin
- Writing your block callback function
- Creating the block template
Getting Started with ACF
When you initially install WordPress, also known as WordPress out of the box, the editing experience is rather basic. The title, the editor, the status, the categories, tags, the featured image, the excerpt, and the discussion or comments are all available for posts. You have even less for pages. The title and editor remain, but there are no categories, tags, or excerpts.
Depending on your theme, you might have page attributes, which might contain a page template. While this is wonderful for simple content, there may be occasions when you wish to add additional information to a website. That’s where custom fields, sometimes known as post meta, come in.
What exactly are custom fields?
Custom fields, often known as post meta, are a WordPress feature that allows users to add additional information while composing a post. WordPress saves this information in the form of metadata. Users can show this metadata in their WordPress themes by using template tags.
Theme developers may use custom fields to extend the data on their posts, pages, or custom post types. By making distinct entries for different types of data and then incorporating that information into their theme.
WordPress: Advanced Custom Fields and Gutenberg Custom Blocks #acf, #wordpress, #gutenberg #gutenbergblocks via @projects_engine
ACF free vs. ACF PRO
Advanced Custom Fields is available in two versions: free and paid. The free version includes the majority of the plugin capabilities. Custom fields may be created, shown on posts, pages, or custom post types, and integrated into your theme. You also get access to over 30 other field types, such as the Color Picker, the Wysiwyg Editor, the Google Map, and others.
The free version of Advanced Custom Fields may be downloaded directly from the WordPress plugin repository in your WordPress dashboard. If you want even more control over Advanced Custom Fields, you may upgrade to the pro version.
Downloading and installing ACF
Now we’ll show you how to use your WordPress dashboard to download and install the free version of Advanced Custom Fields from the WordPress plugin repository. To do so, Go to Plugins and then Add New. Then, in the Search plugins section, look for advanced custom fields. Advanced Custom Fields should be the first result.
Elliot Condon is the author. Install Now, followed by Activate. When you enable the plugin, you’ll see a new section on the left toward the bottom named Custom Fields. Hovering over it reveals a menu of options. This is how we know the plugin was installed and activated successfully and is now available for usage.
Creating Field Groups with ACF
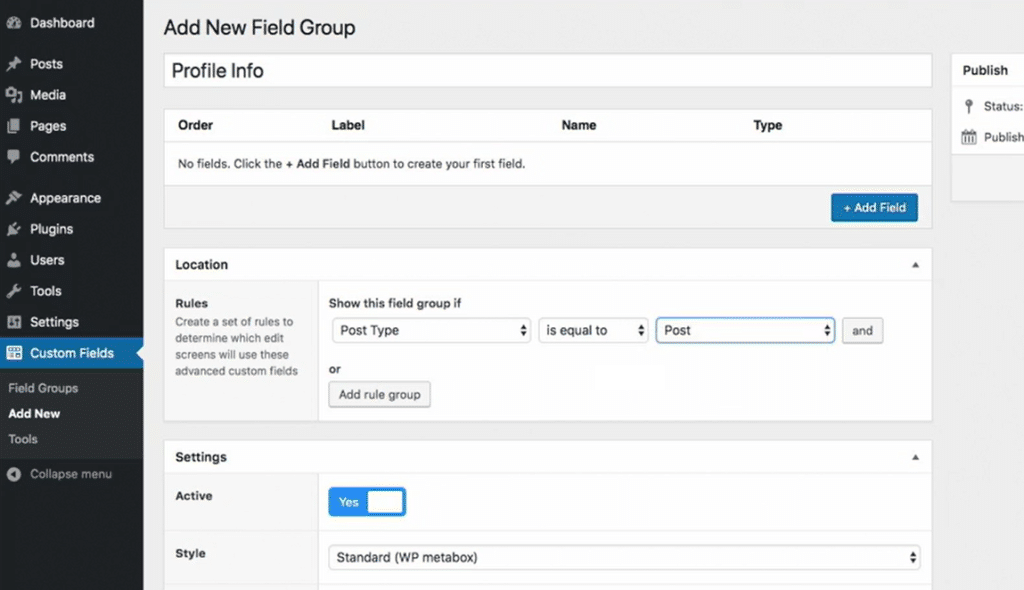
Field Groups are used by Advanced Custom Fields to attach fields to posts or post types. To do so, Go to Custom Fields, Add New. On the screen, you’ll see many sections. You’ll see the title, the fields, the location information, and the settings. Give the field group a title. Create a set of rules under Location to decide which edit screens will use these advanced custom fields. While there are several alternatives available, for the time being, leave it at Post Type.

Displaying Your Fields
Using field groups in the WordPress dashboard to add extra content to our posts is only part of what we need to accomplish. We need to add some code to our theme in order to display the content on the front end. If you’re using a custom theme, one that you created or had created for you, you may make changes directly to that theme.
However, if you’re using a theme from a marketplace or the WordPress theme repository, you shouldn’t make any modifications to it directly. You run the risk of losing them in the next upgrade. Instead, we must create a child theme.
For practicing you can use the Astra theme. It is free and it can be easily downloaded from the WordPress theme repository. Also, you will need to learn how to create child themes and use them in your projects.
Displaying basic fields
It’s time to add the fields to our post template now that we’ve built a child theme. To do so, we’ll need to make changes to the template that controls our single post output. In the template parts folder of the Astra theme, there is a file named content-single.
We’ll need to duplicate that file structure exactly in our child theme. We’ll accomplish this by duplicating the content-single.php template, then going into our Astra child theme, creating a new folder named template parts, and pasting the file we just copied.
Scroll to around line 19 which is Astra entry content single. Here is where you’ll need to add your custom code. Don’t forget to create custom field groups first using the plugin and naming them.
Use the get_field function to display the custom field. You can use the same function to check if the field is empty or not. If the field is empty, then no content will be shown on the front end.
WordPress: Advanced Custom Fields and Gutenberg Custom Blocks #acf, #wordpress, #gutenberg #gutenbergblocks via @projects_engine
Creating a Gutenberg Block
The New Block Editor in WordPress, popularly known as Gutenberg, made it easier to create richer text. It also provided us with a better visual depiction of the information. Shortcodes can now also be blocks. This presents us with a once-in-a-lifetime chance for our custom fields. We may describe our new content as a block instead of displaying it in the ACF short code.
The ACF team has also made it really simple for us to do so without having to understand JavaScript. In particular, react code. We may define the field group, assign it to our block, and then add PHP templates in CSS to play the block on the front end and in the WordPress Editor.
This might also be handy if we have content that we do not want to be associated with a certain post or page. A custom field block enables us to design a collection of fields that may be used anywhere in the block editor. Today and in future WordPress editions.
Defining your block in code
An advanced custom field allows us to construct blocks for our WordPress editor without having to understand React, which is how we would build blocks natively. Rather, we’ll add a few php files to our child theme, beginning with the block definition.
add_action('acf/init', 'pe_define_block');
function pe_define_block() {

   // check function exists
   if( function_exists( 'acf_register_block' ) ) {

      // register a fun facts block
      acf_register_block(array(
         'name'          => 'fun-facts',
         'title'             => __( 'Fun Facts' ),
         'description'     => __('A custom fun facts block.'),
         'render_callback'  => 'pe_render_fun_facts_block',
         'category'       => 'layout',
         'icon'          => 'nametag',
         'keywords'       => array( 'fun', 'facts', 'profiles', 'acf' ),
      ));
   }
}
We’ll add a new action to acf/init. This is effectively acf’s version of WordPress’s default init action, and it instructs acf to perform this function as soon as it is launched. After that, we’ll add our callback function. This will be referred to as pe_define_block. All of our functions will be prefixed with pe.
Then we’ll add the function, pe_define_block, and the first thing we’ll do after adding our function is test if the acf_register_block function exists. So we’ll call the function_exists function and then supply acf_register_block as a parameter. We only want this code to run if we are using an acf version that supports the creation of new blocks.
Then, we’ll register our new block. So we’ll call the function acf_register_block, and we’ll pass an array of arguments to it. The first argument will be the name.
Defining your block in the admin
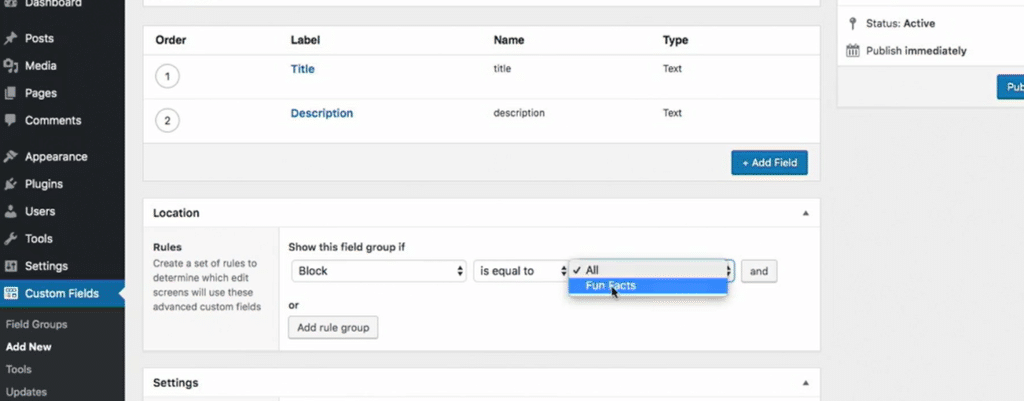
Now that we’ve created our block, it’s time to build the field group. Let’s navigate to our Custom Fields Field Group and click Add New. We’ll call this field group “Fun Facts,” and we’ll add two fields to it. They’ll both be of the field text type. We can close those fields once we’ve added them, and then we’ll move on to the location area.
Instead of Post Type, we’ll scroll down to the bottom of the Forms section and pick the Block option for the first pick box. You’ll notice that the third choice box changes after that. And the block that we just specified appears. So we’ll go ahead and choose it before publishing our new field group.

Writing your block callback function
Defining the block and field group is simply one step in the process. We must now instruct WordPress on how to show our block on both the front and back ends. Let’s define a constant in the function file of our child theme. This constant will serve as our template route.
So we’ll call the function type define, and then we’ll call the constant PE_PATH. The style sheet directory will be the value. To ensure that we have an adequate trailing slash at the end of our route, we’ll first use the function trailingslashit, which is all one word.
define( 'PE_PATH', trailingslashit( get_stylesheet_directory() ) );
function pe_render_fun_facts_block( $block ) {

   // convert name ("acf/fun-facts") into path friendly slug ("fun-facts")
   $slug = str_replace( 'acf/', '', $block['name'] );
   if( file_exists( PE_PATH . "template-parts/block/block-{$slug}.php" ) ) {
      include( PE_PATH . "template-parts/block/block-{$slug}.php" );
   }
}
With our callback function defined, it’s time to create the block template.
Creating the block template
Now that we’ve established our call-back function, we can go on to the template part. We’ll make a new folder named “block” in our child theme’s template parts folder. And under that folder, we’ll add a new file named “block-fun-facts.php.” This must be the same as the name we provided when we registered our block.
<?php
/**
 * Block Name: Fun Facts
 */

$id = 'fun-facts-' . $block['id'];
$align_class = $block['align'] ? 'align' . $block['align'] : '';
?>

<div class="fun-facts <?php echo $align_class; ?>" id="<?php echo $id; ?>">
    <h4><?php the_field( 'fact_title' ); ?></h4>
   <div class="fact-description"><?php the_field( 'fact_description' ); ?></div>
</div>

<style type="text/css">
.fun-facts {
   background: #CFCFCF;
   border: 1px solid #666666;
   margin: 15px;
   padding: 15px;
}

.fun-facts h4 {
   border-bottom: #666666;
}
</style>
Conclusion
Congratulations. Now that you understand how the plugin works and how to interact with it, it’s time to put it to the test and see how advanced custom fields can help you achieve new and interesting things with WordPress.
Was this post helpful? ( Answers: 3 )
Leave a comment
If you enjoyed this post or have any questions, please leave a comment below. Your feedback is valuable!