How to Create a WordPress Custom Widget
Though there are a variety of additional widgets included with themes and plugins, WordPress also allows users to manually code custom widgets.
Table of Contents
- What are WordPress widgets?
- When creating a custom widget, where do you start?
- How do custom widgets in WordPress work?
- Creating a Custom Widget in WordPress
- Extending the WP_Widget class
- Adding __construct()
- Adding widget()
- Adding form()
- Adding update()
- Registering WordPress Custom Widget
- Using the WordPress Custom Widget
- Here is the full class you need to create a custom widget
You can be delighted to hear that you can make your own customized WordPress widget. Though there are a variety of additional widgets included with themes and plugins, WordPress also allows users to manually code custom widgets.
It is a simple process that involves only a basic understanding of WordPress and PHP.
Let’s get started now, without further ado!
What are WordPress widgets?
Using a basic drag-and-drop interface, WordPress widgets make it simple to add additional features to the website. WordPress comes with a range of widgets by design. They provide simple utility functions and are compliant with any WordPress theme.
However, certain basic widgets can not always be able to complete the tasks you need. Your best bet is to search for plugins that have the functionality you need. Unfortunately, you can discover that even third-party plugins are unable to meet your needs.
Fortunately, you have the ability to build your own WordPress custom widget. Bear in mind that it must be designed from the ground up so that you can fine-tune your personalized widget to meet the specific requirements.
When creating a custom widget, where do you start?
You must first decide whether to generate the widget with a plugin or by modifying the functions.php file. When inserting code to functions.php, a plugin would allow the custom widget to run on any web. This helps the widget to work with a particular theme.
Second, you can either apply the widget to a live site or to a local setting. However, we firmly urge you to test the widget in a local environment before implementing it.
Once the plugin is done and working correctly, it is time to move the tool to your website.
How do custom widgets in WordPress work?
You must use the basic WP Widget class from the Widgets API to build a custom widget in WordPress. You can experiment with around 20 different methods. The minimum prerequisite for any widget to operate is four of these:
- __construct() – where you can define your widget’s parameters
- widget() – output of the widget.
- form() – determines widget settings
- update() – updates widget settings
Of course, there are a number of other solutions available to offer extra features. Check out the WordPress developer page for more information on the WP Widget class.
Creating a Custom Widget in WordPress
Before continuing, it is highly advised that you build a complete backup of your WordPress website. Additionally, you should use a WordPress child theme or a plugin to avoid any problems with your main theme.
To learn the fundamentals of widget design in WordPress, we’ll create a simple “Get a Random Post” custom widget in this tutorial. After that, you should go ahead and make more complicated widgets of your own.
Another thing to keep in mind is that you can write this code in the theme’s functions.php file. We are going to use separate files and folders that will be included in the functions.php file. That said, the same code can be used with any custom plugin.
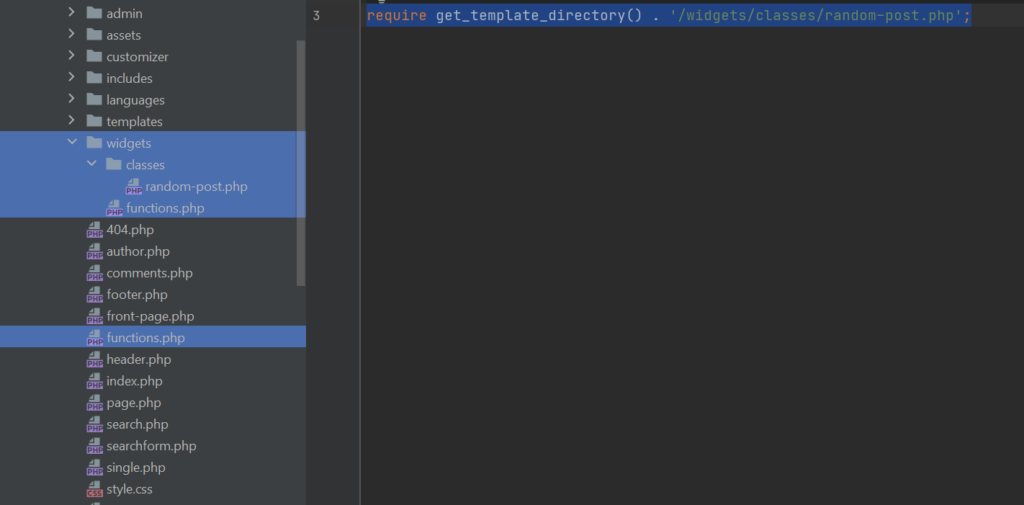
Create a separate folder in the main theme file called widgets. In the same folder create another folder called classes and a file called main.php. In the main file, you can require all of the widget classes that will be added to the classes folder like this:
require get_template_directory() . '/widgets/classes/random-post.php';
Next just add this line in you main functions.php file like this:
require get_template_directory() . '/widgets/functions.php';
Extending the WP_Widget class
To start, open any text editor on your machine and build a new class that extends the base WP Widget class, as shown below:
class PE_Random_Post extends WP_Widget {
    // Insert functions here

}
Adding __construct()
Then, one by one, we introduce the four regular features. The first is the constructor method, which specifies the ID, name, and definition of the custom widget.
public function __construct() {
    // actual widget processes
    parent::__construct(
	'pe_random_post', // Base ID
	'Random Post', // Name
	array(
            'description' => __( 'Display random post.', 'projectsengine' ),
        )
    );
}
Adding widget()
Let’s look at the widget() method now. It determines how your WordPress custom widget appears on the front end.
public function widget( $args, $instance ) {
    // outputs the content of the widget
    extract( $args );
    $title = apply_filters( 'widget_title', $instance['title'] );

    echo $before_widget;

    if ( ! empty( $title ) ) {
	echo $before_title . $title . $after_title;
    }

    $random = getRandomPost(); ?>
    <div class="other-post other-post-widget">
	<h5>you might like</h5>
	<h2><?= $random->post_title; ?></h2>
	<p><?= $random->post_excerpt; ?></p>
	<a target="_blank" href="<?= '/' . $random->post_name; ?>">read more</a>
    </div>

    <?php echo $after_widget;
}
function getRandomPost() {
$posts = new WP_Query([
'post_type' => 'post',
'posts_per_page' => 1,
'orderby' => 'rand'
]);
$post = $posts->posts;
return $post[0];
}With this, we’ve set our widget’s output to show a random post as well as the title defined by the user. Note that the styling is not perfect. You should do it yourself and make it look appealing to users.
Adding form()
Now we must use the form() method to configure the widget’s backend. When you try to add the widget from the WordPress Dashboard, you will see the output.
public function form( $instance ) {
// outputs the options form in the admin
if ( isset( $instance[ 'title' ] ) ) {
$title = $instance[ 'title' ];
}
else {
$title = __( '', 'projectsengine' );
}
?>
<p>
<label for="<?php echo $this->get_field_name( 'title' ); ?>"><?php _e( 'Title:' ); ?></label>
<input class="widefat" id="<?php echo $this->get_field_id( 'title' ); ?>" name="<?php echo $this->get_field_name( 'title' ); ?>" type="text" value="<?php echo esc_attr( $title ); ?>" />
</p>
<?php
}Adding update()
After that, we must implement update(), which will update the widget if the settings are changed.
public function update( $new_instance, $old_instance ) {
// processes widget options to be saved
$instance = array();
$instance['title'] = ( !empty( $new_instance['title'] ) ) ? strip_tags(
$new_instance['title'] ) : '';
return $instance;
}We’ll take the newly generated instance’s current title and remove any HTML/PHP tags. The title is then passed to the instance and returned.
Registering WordPress Custom Widget
// Register PE_Random_Post widget
add_action( 'widgets_init', 'register_pe_random_post' );
function register_pe_random_post() {
register_widget( 'PE_Random_Post' );
}Using the WordPress Custom Widget
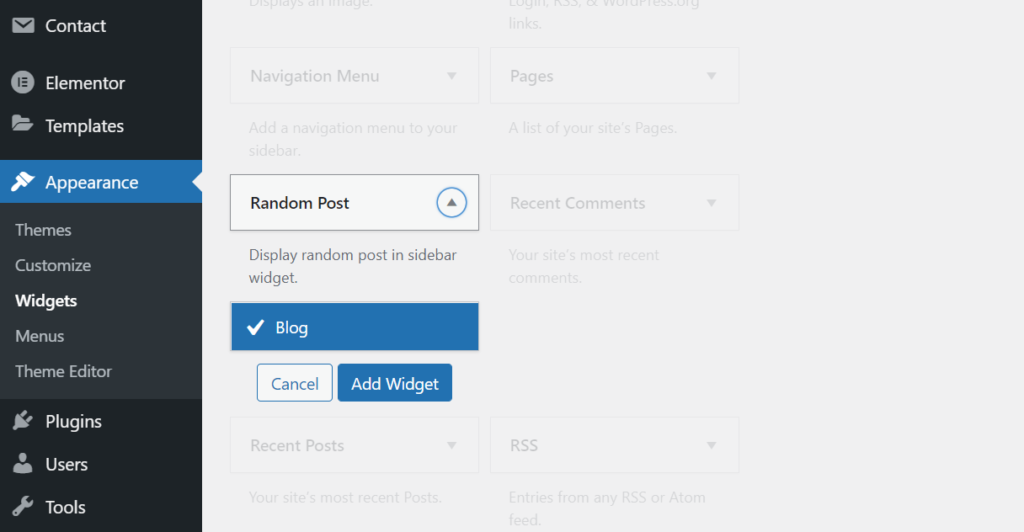
- Pick Widgets from the Appearance menu. In the Available Widgets list, you should see a widget called “Random Post”.
- Then, on the right side of the screen, drag and drop the widget into a sidebar column.
- Visit your website after saving your updates. A personalized widget with a random post will show.

Here is the full class you need to create a custom widget
You may use a WordPress custom widget to add a special feature to your website depending on your requirements. It’s a perfect choice when you can’t find something unique that suits your needs. To recap, here are the steps to building your own personalized WordPress widget:
- Create a new class that extends WP_Widget
- Start with __construct() to determine the parameters of the widget
- Use widget() to define the appearance of the widget
- Add form() to configure how the widget will look.
- Add update() to refresh the widget every time you change it.
- Use the add_action() function to register the new custom widget
- Go to the Widgets to add the widget to a sidebar
<?php
class PE_Random_Post extends WP_Widget {
public function __construct() {
// actual widget processes
parent::__construct(
'pe_random_post', // Base ID
'Random Post', // Name
array( 'description' => __( 'Display random post in sidebar widget.', 'projectsengine' ), ) // Args
);
}
public function widget( $args, $instance ) {
// outputs the content of the widget
extract( $args );
$title = apply_filters( 'widget_title', $instance['title'] );
echo $before_widget;
if ( ! empty( $title ) ) {
echo $before_title . $title . $after_title;
}
$random = getRandomPost(); ?>
<div class="other-post other-post-widget">
<h5>you might like</h5>
<h2><?= $random->post_title; ?></h2>
<p><?= $random->post_excerpt; ?></p>
<a target="_blank" href="<?= site_url() . '/' . $random->post_name; ?>" class="button other-post-btn">read more</a>
</div>
<?php echo $after_widget;
}
public function form( $instance ) {
// outputs the options form in the admin
if ( isset( $instance[ 'title' ] ) ) {
$title = $instance[ 'title' ];
}
else {
$title = __( '', 'projectsengine' );
}
?>
<p>
<label for="<?php echo $this->get_field_name( 'title' ); ?>"><?php _e( 'Title:' ); ?></label>
<input class="widefat" id="<?php echo $this->get_field_id( 'title' ); ?>" name="<?php echo $this->get_field_name( 'title' ); ?>" type="text" value="<?php echo esc_attr( $title ); ?>" />
</p>
<?php
}
public function update( $new_instance, $old_instance ) {
// processes widget options to be saved
$instance = array();
$instance['title'] = ( !empty( $new_instance['title'] ) ) ? strip_tags( $new_instance['title'] ) : '';
return $instance;
}
}
/**
* Return random post.
*
* @return int|WP_Post
*/
function getRandomPost() {
    $posts = new WP_Query([
	'post_type' => 'post',
	'posts_per_page' => 1,
	'orderby' => 'rand'

    ]);

    $post = $posts->posts;

    return $post[0];
}
// Register Foo_Widget widget
add_action( 'widgets_init', 'register_pe_random_post' );
function register_pe_random_post() {
register_widget( 'PE_Random_Post' );
}