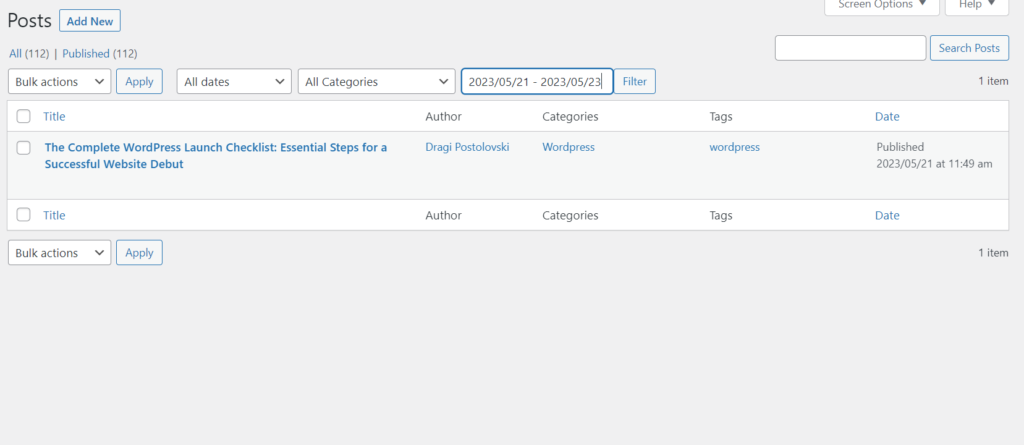
How to Add Custom Filters like Date Range in the Posts List in WordPress Admin
The WordPress admin area provides powerful tools to manage your website's content, including the ability to filter and sort posts.
The WordPress admin area provides powerful tools to manage your website’s content, including the ability to filter and sort posts. However, the default filters may not always meet your specific needs. In this article, we will explore how to add custom filters, specifically a date range filter, to the posts list in the WordPress admin area. By following these steps, you can enhance your content management experience and easily find posts within a specific date range.
1. Understanding the Need for Custom Filters: Before we dive into the implementation, it’s essential to understand why custom filters are beneficial. Custom filters allow you to narrow down your search based on specific criteria, such as a date range. This can be particularly useful when you have a large number of posts and want to quickly find content published within a specific period.
2. Creating a Custom Plugin: To add custom filters to the posts list in WordPress, we will create a custom plugin. Plugins are a flexible and efficient way to extend the functionality of your WordPress website. If you’re unfamiliar with plugin development, you can refer to our guide on how to create a custom plugin in WordPress for a step-by-step walkthrough.
3. Setting Up the Plugin Structure: Start by creating a new folder in the “wp-content/plugins” directory of your WordPress installation. Give the folder a descriptive name, such as “custom-post-filters.” Inside this folder, create a new PHP file named “custom-post-filters.php.” This file will serve as the main plugin file.
4. Defining the Plugin Header: In the “custom-post-filters.php” file, begin by adding the plugin header. The header contains essential information about the plugin, such as its name, author, and version. Here’s an example of how the plugin header should be structured:
<?php
/*
Plugin Name: Custom Post Filters
Description: Adds custom filters, including a date range filter, to the posts list in the WordPress admin area.
Author: Your Name
Version: 1.0
*/
5. Enqueuing the Plugin Stylesheet and JavaScript: Next, we need to enqueue the plugin’s stylesheet and JavaScript files. These files will be responsible for adding the necessary styling and functionality to the admin area. To do this, we will use the admin_enqueue_scripts hook. Add the following code to the plugin file:
<?php
function custom_post_filters_enqueue_scripts() {
  wp_enqueue_style( 'custom-post-filters', plugin_dir_url( __FILE__ ) . 'css/custom-post-filters.css' );
  wp_enqueue_script( 'custom-post-filters', plugin_dir_url( __FILE__ ) . 'js/custom-post-filters.js', array( 'jquery' ), '1.0', true );
}
add_action( 'admin_enqueue_scripts', 'custom_post_filters_enqueue_scripts' );
Make sure to create the “css” and “js” folders within your plugin directory and include the necessary CSS and JavaScript files.
6. Adding the Date Range Filter: Now comes the exciting part – adding the date range filter to the posts list. We will achieve this by utilizing the restrict_manage_posts action hook. This hook allows us to add custom filters to the posts list table. Add the following code to your plugin file:
<?php
function custom_post_filters_date_range_filter() {
  global $pagenow;
  if ($pagenow === 'edit.php') {
    echo '<input type="text" id="date-range" name="date-range" placeholder="Select date range" />';
  }
}
add_action( 'restrict_manage_posts', 'custom_post_filters_date_range_filter' );
This code adds an input field with the ID “date-range” to the posts list table. Users can enter a date range to filter the posts accordingly.
7. Filtering the Posts based on Date Range: To actually filter the posts based on the entered date range, we need to use the pre_get_posts action hook. This hook allows us to modify the query before it is executed. Add the following code to your plugin file:
<?php
function custom_post_filters_filter_by_date_range( $query ) {
  global $pagenow;
  if ( is_admin() && $pagenow === 'edit.php' && isset( $_GET['date-range'] ) ) {
    $date_range = sanitize_text_field( $_GET['date-range'] );
    $date_range = explode( ' - ', $date_range );
    $start_date = isset( $date_range[0] ) ? $date_range[0] : '';
    $end_date   = isset( $date_range[1] ) ? $date_range[1] : '';
    if ( $start_date && $end_date ) {
      $query->set( 'date_query', array(
        array(
          'after'     => $start_date,
          'before'    => $end_date,
          'inclusive' => true,
        ),
      ) );
    }
  }
}
add_action( 'pre_get_posts', 'custom_post_filters_filter_by_date_range' );
This code retrieves the entered date range from the URL parameter and modifies the query accordingly. The posts will be filtered based on the selected date range.

Conclusion: By following the steps outlined in this article, you can easily add custom filters like a date range to the posts list in the WordPress admin area. Custom filters provide a convenient way to search and manage your posts more efficiently. Remember to activate your custom plugin after creating it. Now you can enhance your content management workflow and locate posts within specific date ranges with ease.
Remember, if you need help creating a simple WordPress site from scratch, you can refer to our guide on how to create a simple WordPress site from scratch. Happy filtering!
Please note that the article is a general guideline, and you may need to customize the code according to your specific requirements.
